이벤트 연결하기
이벤트(Event) : 사용자와의 상호작용으로 인해 발생하는 일련의 사건
ex) 마우스 클릭, 키보드 입력 등
<JSXElement 이벤트속성="이벤트핸들러">
- 이벤트속성 : 사용자 동작에 반응하기 위해 요소에 추가하는 속성 <-- 카멜케이스로 작성
- 이벤트핸들러 : 사용자 동작이 발생했을 때 실행되는 함수
// App.tsx

import Button from "./components/ui/Button";

export default function App() {
  return (
    <Button />
  );
}
// Button.tsx
export default function Button () {
const handleClick = () => alert("클릭 이벤트 발생");
return (
<>
<button onClick={handleClick}>클릭</button> // 이벤트속성={이벤트핸들러}
</>
);
}
이벤트 핸들러에 매개변수 전달하기
이벤트 핸들러도 결국 자바스크립트 함수이기 때문에 매개변수 전달 가능
// App.tsx

import Button from "./components/ui/Button";

export default function App() {
  return (
    <>
      <Button />
    </>
  );
}
// Button.tsx
export default function Button() {
const handleClick = (value: string) => alert(value);
return (
<>
<button onClick={() => handleClick("Hello")}>클릭</button>
<button onClick={() => alert("World!")}>클릭</button>
</>
);
}
- <button onClick={handleClick("Hello")}>클릭</button>
- 이벤트핸들러에 소괄호를 붙이면 화면이 그려지자마자 실행됨
- <button onClick={handleClick}>클릭</button>
- 사용자의 동작이 발생하면 실행되지만, 인자 전달 불가능
- <button onClick={() => handleClick("Hello")}>클릭</button>
- 사용자의 동작이 발생하면 실행되고, 인자 전달 가능
- 인자를 넘기고 싶을 때에는 `() => ...` 로 감싸주기
이벤트 핸들러 방법 추천
1. 익명 함수 / 인라인 이벤트 핸들러
export default function Button() {
  return (
    <>
      <button onClick={() => alert("click")}>클릭</button>
    </>
  );
}
2. 별도 정의 후 참조
export default function Button() {
  const handleClick = () => alert("click");
  return (
    <>
      <button onClick={handleClick}>클릭</button>
    </>
  );
}
* 매개변수가 없을 때
3. 하이브리드 / 화살표 함수 래퍼
export default function Button() {
  const handleClick = () => alert("click");
  return (
    <>
      <button onClick={() => handleClick()}>클릭</button>
    </>
  );
}
* 매개변수가 있을 때
이벤트 핸들러에서 props 읽기
// App.tsx

import Button from "./components/ui/Button";

export default function App() {
  return (
    <>
      <Button message="Playing!">Play Movie</Button> // message는 일반 props, PlayMovie는 children
      <Button message="Uploading!">Upload Image</Button>
    </>
  );
}
// Button.tsx
export default function Button(props: {
message: string;
children: React.ReactNode;
}) {
const handleClick = () => alert(props.message);
return (
<>
<button onClick={handleClick}>{props.children}</button>
</>
);
}
이벤트 핸들러를 props로 전달하기
부모 컴포넌트에서 props로 이벤트 핸들러를 전달하는 것도 가능
// App.tsx

import Button from "./components/ui/Button";

export default function App() {
  return (
    <>
      <Button handleClick={() => alert("Playing")}>Play Movie</Button>
      <Button handleClick={() => alert("Uploading")}>Upload Image</Button>
    </>
  );
}
// Button.tsx
export default function Button(props: {
handleClick: () => void; // 매개변수가 없는 void 함수라는 의미
children: React.ReactNode;
}) {
return (
<>
<button onClick={props.handleClick}>{props.children}</button>
</>
);
}
매개변수를 활용하는 형태로 코드 변환
// App.tsx

import Button from "./components/ui/Button";

export default function App() {
  return (
    <>
      <Button handleClick={(message: string) => alert(message)} message="Playing!">Play Movie</Button>
      <Button handleClick={(message: string) => alert(message)} message="Uploding!">Upload Image</Button>
    </>
  );
}
// Button.tsx
export default function Button(props: {
handleClick: (message: string) => void;
message: string;
children: React.ReactNode;
}) {
return (
<>
<button onClick={() => props.handleClick(props.message)}>{props.children}</button>
</>
);
}
이벤트 객체 배우기 - 1
이벤트 객체(Event Object) : 이벤트가 발생했을 때 브라우저가 자동으로 생성하여 이벤트 핸들러에 전달하는 객체
ㄴ 이벤트와 관련된 다양한 정보를 포함하고 있는 객체
ex) 이벤트가 발생한 요소, 마우스 좌표, 키보드 입력 값
합성 이벤트(SyntheticEvent) : 원본 DOM 이벤트 객체를 감싸(래핑) 최적화한 리액트 전용 이벤트 객체
// App.tsx

import Button from "./components/Button";

export default function App() {
  return (
    <>
      <Button />
    </>
  );
}
// Button.tsx
export default function Button() {
const handleClick = () => {
console.log("click!");
}
return (
<>
<button onClick={handleClick}>클릭</button>
</>
);
}
* 이벤트 핸들러에 매개변수를 전달하고 있지 않지만, React는 암묵적으로 이벤트 핸들러에 이벤트 객체를 전달함
// App.tsx

import Button from "./components/Button";

export default function App() {
  return (
    <>
      <Button />
    </>
  );
}
// Button.tsx
export default function Button() {
const handleClick = (
message: string,
event: React.MouseEvent<HTMLButtonElement, MouseEvent>, // 이벤트 객체를 받기 위한 식별자 event
) => {
console.log(message);
console.log(event); // 합성 이벤트 객체가 전달됨을 확인할 수 있음
};
return (
<>
<button onClick={(event) => handleClick("click!", event)}>클릭</button>
</>
);
}
* 이벤트 객체의 타입은, 화살표 함수로 감싸서 명시적으로 전달해주면 발생하는 타입 추론에 의해 쉽게 확인할 수 있음
이벤트 객체의 전달
- 암묵적 전달
- 이름만 적을 때
- React가 이벤트 객체를 이벤트 핸들러에게 암묵적으로 전달해줌
- onClick={handleClick} → handleClick(e)를 리액트가 실행함
- 명시적 전달
- 매개변수를 전달할 때 = 화살표 함수를 사용할 때
- 사용자가 직접 이벤트 객체를 이벤트 핸들러에게 명시적으로 전달해야 함
- onClick={() => handleClick("Hi")} → handleClick("Hi") 만 실행됨 (e는 증발) (X)
- onClick={(e) => handleClick(e, "Hi")} → e를 붙잡아서 안으로 던져줌 (O)
이벤트 객체 배우기 - 2
자식 컴포넌트 내에서 이벤트 핸들러를 정의하는 경우
// App.tsx

import Button from "./components/Button";

export default function App() {
  return (
    <>
      <Button />
    </>
  );
}
// Button.tsx
export default function Button() {
const handleClick = (
event: React.MouseEvent<HTMLButtonElement, MouseEvent>,
) => {
console.log(event);
};
return (
<>
<button onClick={handleClick}>클릭</button>
</>
);
}
부모 컴포넌트에서 이벤트 핸들러를 정의해서 자식에게 전달하는 경우
import Button from "./components/ui/Button";

export default function App() {

  const handleClick = (
    message: string,
    event: React.MouseEvent<HTMLButtonElement, MouseEvent>,
  ) => {
    console.log(message)
    console.log(event);
  };

  return (
    <>
      <Button handleClick={handleClick} />
    </>
  );
}
// Button.tsx
export default function Button({
handleClick,
}: {
handleClick: (
message: string,
event: React.MouseEvent<HTMLButtonElement, MouseEvent>,
) => void;
}) {
return (
<>
<button onClick={(event) => handleClick("Hello", event)}>클릭</button>
</>
);
}
이벤트 객체 배우기 - 3
React에서의 이벤트 객체 : 원본 DOM 이벤트를 래핑한 SyntheticEvent 객체를 제공
--> 브라우저마다 다른 native 이벤트 동작을 일관된 방식으로 처리할 수 있도록 지원
SyntheticEvent 특징
- SyntheticBaseEvent를 기반으로 생성됨
- 포괄적으로 SyntheticEvent라고 통칭
- 모든 이벤트는 SyntheticEvent 형태로 전달됨
- ex) onClick, onChange 등
- 실제 DOM 이벤트는 nativeEvent 속성으로 접근 가능
이벤트 흐름
- 버튼 클릭 시
- 브라우저 : MouseEvent / PointerEvent 발생
- React : 이를 감싸 SyntheticEvent로 변환 후 전달
// App.tsx

import Button from "./components/ui/Button";

export default function App() {
  const handleClick = (
    message: string,
    event: React.MouseEvent<HTMLButtonElement, MouseEvent>
  ) => {
    console.log(message);
    console.log(event);
    event.currentTarget.innerText = message; // currentTarget == 이벤트가 바인딩된 버튼 요소
    // --> 클릭된 버튼의 innerText를 전달받은 message 값으로 변경
  };
  return (
    <>
      <Button handleClick={handleClick} />
    </>
  );
}
// Button.tsx
export default function Button({
handleClick,
}: {
handleClick: (
message: string,
event: React.MouseEvent<HTMLButtonElement, MouseEvent>
) => void;
}) {
return (
<>
<button onClick={(event) => handleClick("Hello", event)}>클릭</button>
</>
);
}
이벤트 전파 - 버블링
이벤트 전파 : DOM에서 이벤트가 발생했을 때, 이벤트가 요소 간에 전달되는 과정
이벤트 전파 단계
- 캡쳐링
- 최상위 요소부터 이벤트가 발생한 타겟 요소까지 순차적으로 내려오는 과정
- 타겟
- 이벤트가 실제로 발생한 요소에서 실행되는 단계
- 버블링
- 타겟 요소에서부터 부모 요소 방향으로 이벤트가 올라가는 과정
일반적으로 React, JavaScript 모두 기본 이벤트 전파 방식은 버블링
React에서 버블링 실행 과정 확인해보기
// App.tsx

import Table from "./components/Table";

export default function App() {
  return (
    <>
      <Table />
    </>
  );
}
// Table.tsx
export default function Table () {
return (
<>
<table border={1} onClick={() => console.log("table")}>
<tbody onClick={() => console.log("tbody")}>
<tr onClick={() => console.log("tr")}>
<td onClick={() => console.log("td")}>Mike</td>
</tr>
</tbody>
</table>
</>
);
}
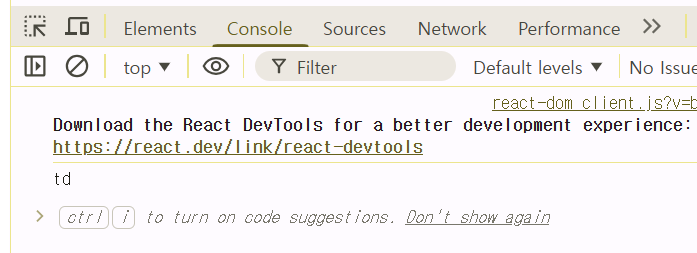
td → tr → tbody → table
td에서 이벤트가 발생하면, 버블링 단계에 의해 부모 요소로 이벤트가 전달됨
--> td, tr, tbody, table에 등록된 onClick 이벤트가 모두 실행됨
이벤트 버블링 막는 방법
event.stopPropagation();
: 현재 요소에서 이벤트 전파를 중단 --> 부모 요소로 이벤트가 올라가지 않음
// App.tsx

import Table from "./components/Table";

export default function App() {
  return (
    <>
      <Table />
    </>
  );
}
// Table.tsx
export default function Table() {
return (
<>
<table border={1} onClick={() => console.log("table")}>
<tbody onClick={() => console.log("tbody")}>
<tr onClick={() => console.log("tr")}>
<td
onClick={(event) => {
event.stopPropagation(); // 버블링 막기
console.log("td");
}}
>
Mike
</td>
</tr>
</tbody>
</table>
</>
);
}
이벤트 전파 - 캡쳐링
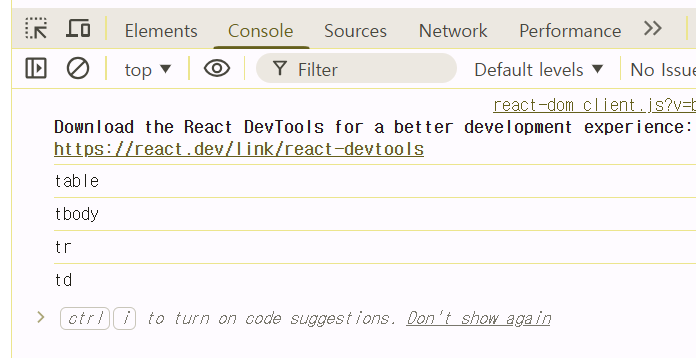
캡쳐링 단계에서 이벤트를 처리하고 싶다면 기본 이벤트 속성이 아닌 Capture 이벤트를 사용해야 함
React에서 캡쳐링 사용
- 기본 이벤트(onClick 등)는 버블링 단계에서 실행됨
- 캡쳐링 단계에서 실행하고 싶다면 이벤트 이름 뒤에 Capture를 붙임
- onClick --> onClickCapture
// App.tsx

import Table from "./components/Table";

export default function App() {
  return (
    <>
      <Table />
    </>
  );
}
export default function Table() {
return (
<>
<table border={1} onClickCapture={() => console.log("table")}> // 캡쳐링 처리
<tbody onClickCapture={() => console.log("tbody")}>
<tr onClickCapture={() => console.log("tr")}>
<td
onClickCapture={(event) => {
event.stopPropagation();
console.log("td");
}}
>
Mike
</td>
</tr>
</tbody>
</table>
</>
);
}
이벤트 기본 동작 막기
- 모든 HTML 요소는 기본 동작(default behavior)을 가짐
- a 태그 --> 페이지 이동
- form 태그 --> 제출
- JSX도 동일하게 동작함
- JSX는 결국 HTML로 변환되기 때문
기본 동작 차단 방법
event.preventDefault();
: 이벤트 객체의 해당 메소드를 호출하면 해당 요소의 기본 동작을 막을 수 있음
// App.tsx

export default function App() {

  const handleSubmit = (event: React.FormEvent<HTMLFormElement>) => {
    event.preventDefault();
  }

  return (
    <>
    <form onSubmit={handleSubmit}>
      <a
        href="https://ko.wikipedia.org/"
        onClick={(event) => event.preventDefault()}
      >
        위키피디아
      </a>
      <button type="submit">전송</button>
    </form>
    </>
  );
}
// App.tsx

import Button from "./components/Button";

export default function App () {

  const handleClick = (message: string) => alert(message);

  return (
    <>
      <Button handleClick={handleClick} message="로그인되었습니다.">Login</Button>
      <Button handleClick={handleClick} message="로그아웃되었습니다.">Logout</Button>
    </>
  );
}
// Button.tsx
export default function Button({
message,
handleClick,
children,
}: {
children: React.ReactNode;
message: string;
handleClick: (message: string) => void;
}) {
return (
<>
<button onClick={() => handleClick(message)}>{children}</button>
</>
);
}'React > 타입스크립트로 배우는 리액트(React.js) : 기초부터 최신 기술까지' 카테고리의 다른 글
| 섹션 8. 컴포넌트 스타일링 (2) (0) | 2026.04.21 |
|---|---|
| 섹션 8. 컴포넌트 스타일링 (1) (0) | 2026.04.16 |
| 섹션 7. 반복 렌더링과 조건부 렌더링 (0) | 2026.04.09 |
| 섹션 6. 컴포넌트 상태 (0) | 2026.04.03 |
| 섹션 4. 컴포넌트와 Props (0) | 2026.03.26 |